Deploy a react application to an AWS EC2 Instance using AWS CodePipeline, CodeBuild CodeDeploy & S3.
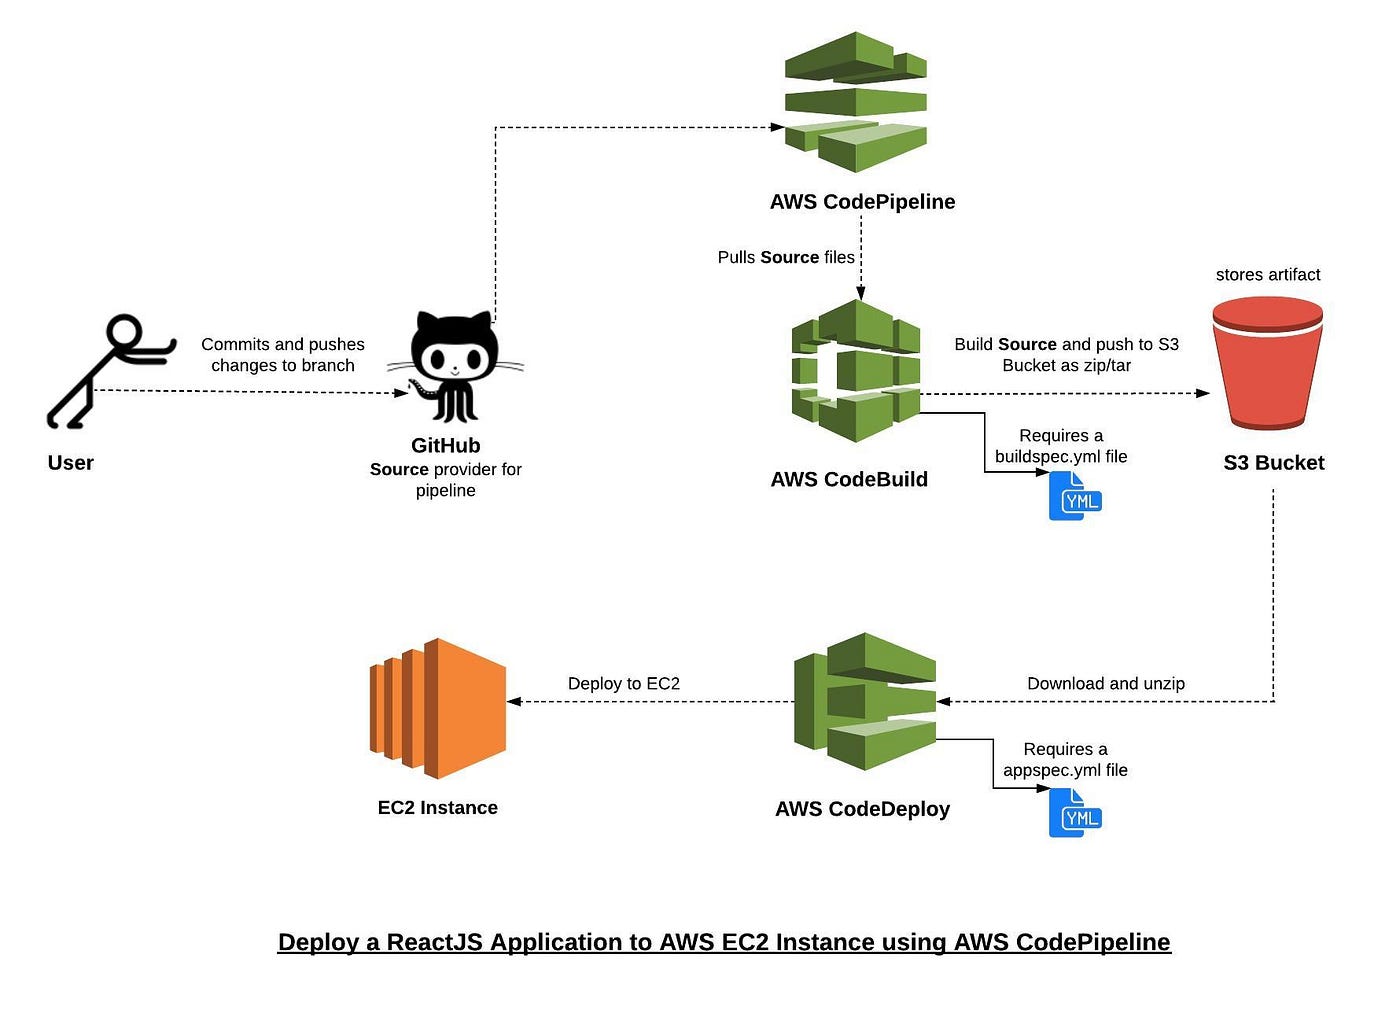
For learning continuous integration and continuous delivery(CI/CD) via AWS CodePipeline purposes, rather than deploying a “hello world” app, I created a react app that fetches movies, their IMDB rating and other details from the open movie database leveraging the OMDB API.
This post will focus on setting up your AWS CodePipeline and deploying your ReactJS application to an AWS EC2 instance. We will assume you already have your AWS account, an IAM user setup and a ReactJS application on GitHub ready to be deployed!
Introduction
ReactJS is a declarative, efficient, and flexible JavaScript library for building user interfaces. It is an open-source, component-based, front-end library only responsible for the application’s view layer.
Node.js is a JavaScript runtime built on Chrome’s V8 JavaScript engine. Node.js uses an event-driven, non-blocking I/O model that makes it lightweight and efficient.
Amazon Web Services (AWS) is the world’s most comprehensive and broadly adopted cloud platform, offering over 175 fully featured services from data centers globally. Millions of customers are using AWS to lower costs, become more agile, and innovate faster. Compute, Storage, Database, Migration, Network and Content Delivery, Management Tools, Security & Identity Compliance, and Messaging are some of the main services provided by AWS.
Steps that we will follow:
Create IAM Role for EC2 and AWS CodeDeploy
Launch an EC2 instance
Create a CodePipeline using Github, CodeBuild and CodeDeploy
Access your React app on EC2 public DNS
Discuss registering a domain name
Final thoughts
1. Create IAM Role for EC2 and AWS CodeDeploy
AWS service roles are used to grant permissions to an AWS service so it can access AWS resources. The policies that you attach to the service role determine which AWS resources the service can access and what it can do with those resources.
Let’s navigate to our AWS Management Console and search for IAM service. Now create a new role for EC2 and AWS CodeDeploy:

Identity and Access Management (IAM) — Roles Dashboard
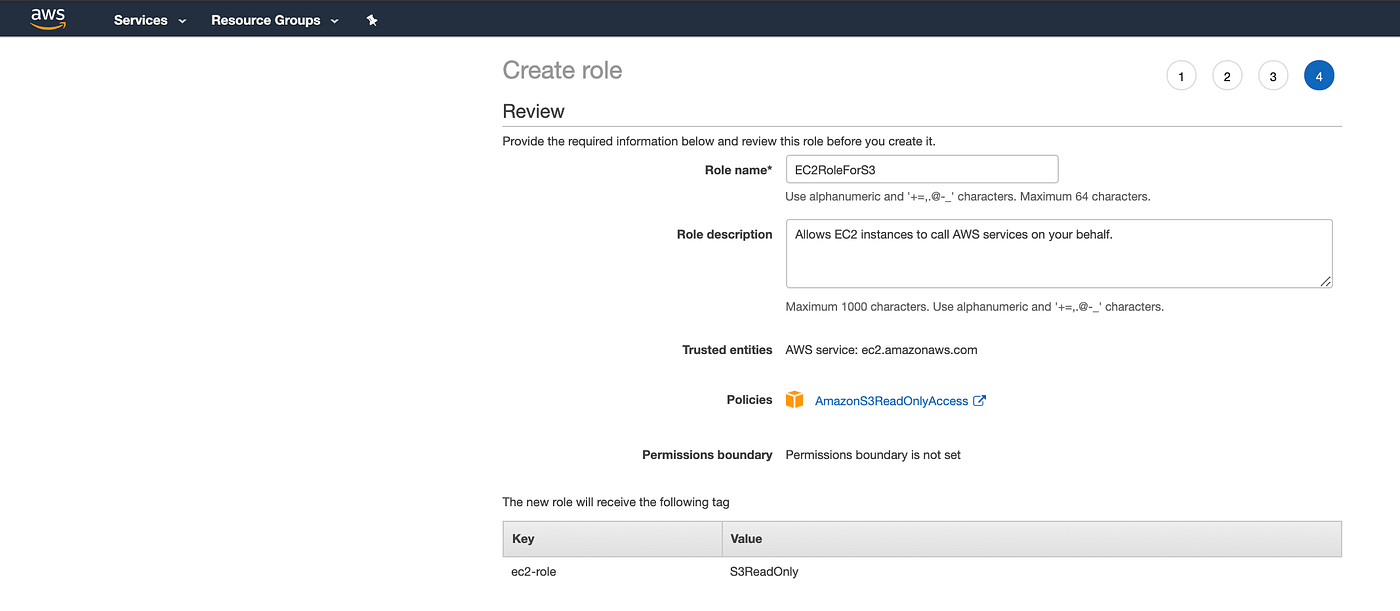
Create a new role for EC2 and attach AmazonS3ReadOnlyAccess policy which will allow our EC2 instance to access stored artifacts from the Amazon S3 bucket.
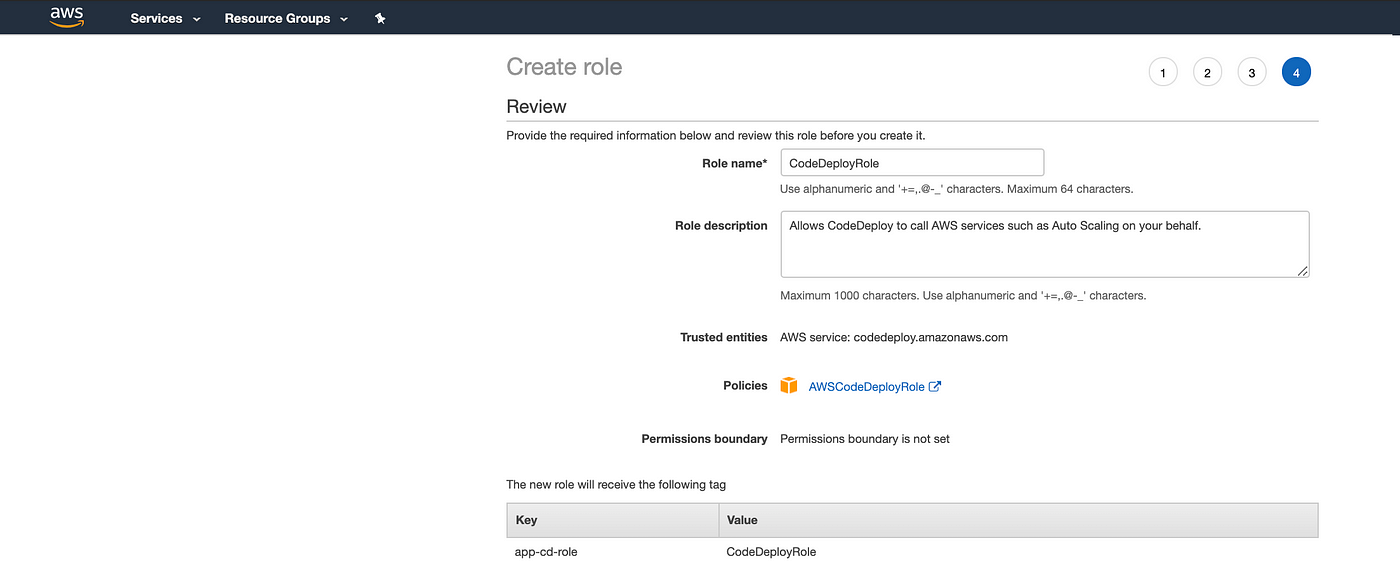
Create a new service role for CodeDeploy and attach AWSCodeDeployRole policy which will provide the permissions for our service role to read tags of our EC2 instance, publish information to Amazon SNS topics and much more
2. Launch an EC2 instance
Now, let’s launch our EC2 instance! Under AWS Management Console, Click on the EC2 under Compute which will take us to the EC2 Dashboard page. Now click on Launch Instance:
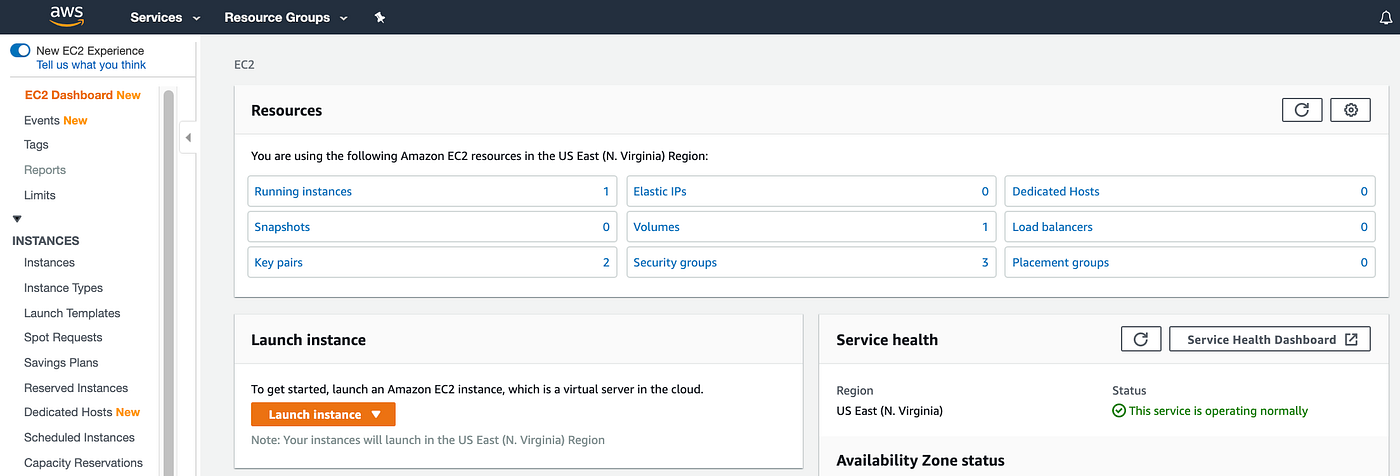
EC2 Dashboard

We will choose Amazon Linux AMI 2018.03.0 as our Amazon Machine Image(AMI) for launching our instance

Choose an Instance Type
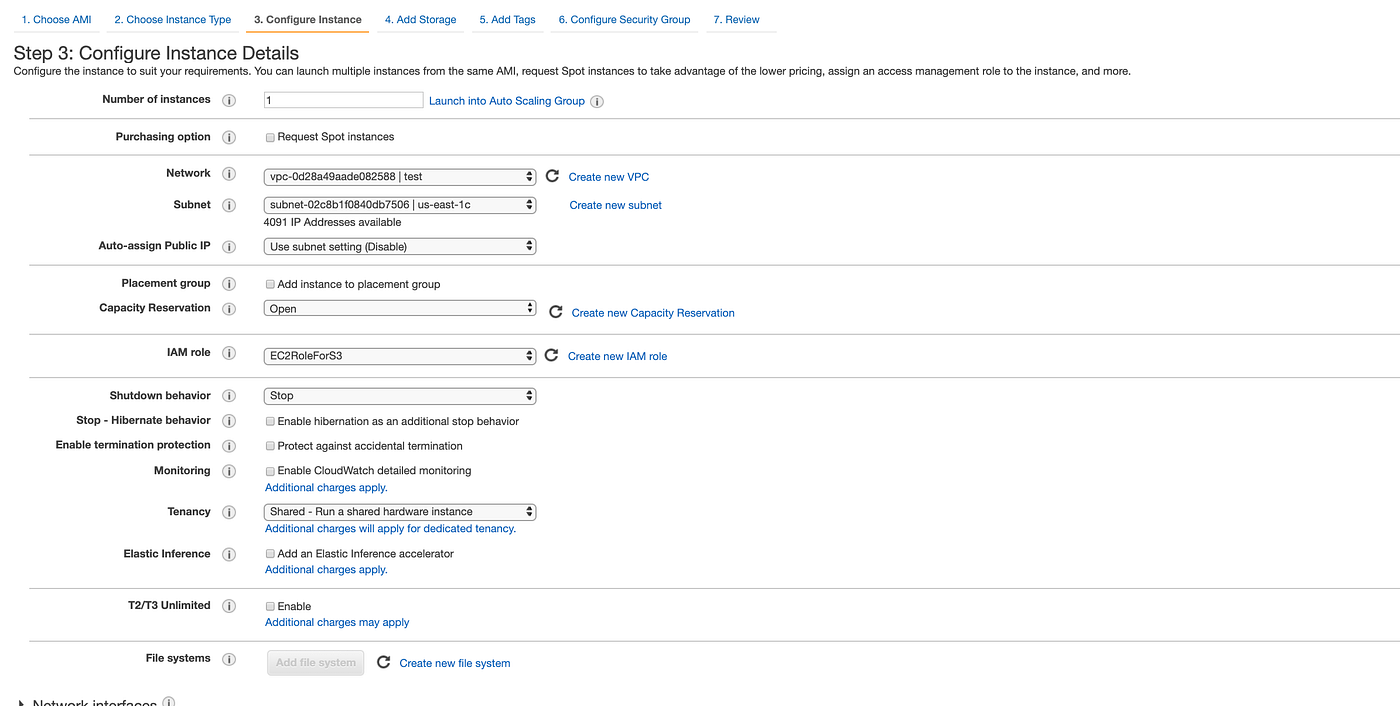
You can choose your default VPC (configured for you by AWS) next to Network. Also, choose the IAM role we created earlier for EC2 with AmazonS3ReadOnlyAccess policy attached

Our instance will be launched with the above storage device settings. You can attach additional EBS volumes and instance store volumes to your instance, or edit the settings of the root volume.

To help you manage your instances, images, and other Amazon EC2 resources, you can optionally assign your own metadata to each resource in the form of tags

On this page, you can add firewall rules to allow specific traffic to reach your instance
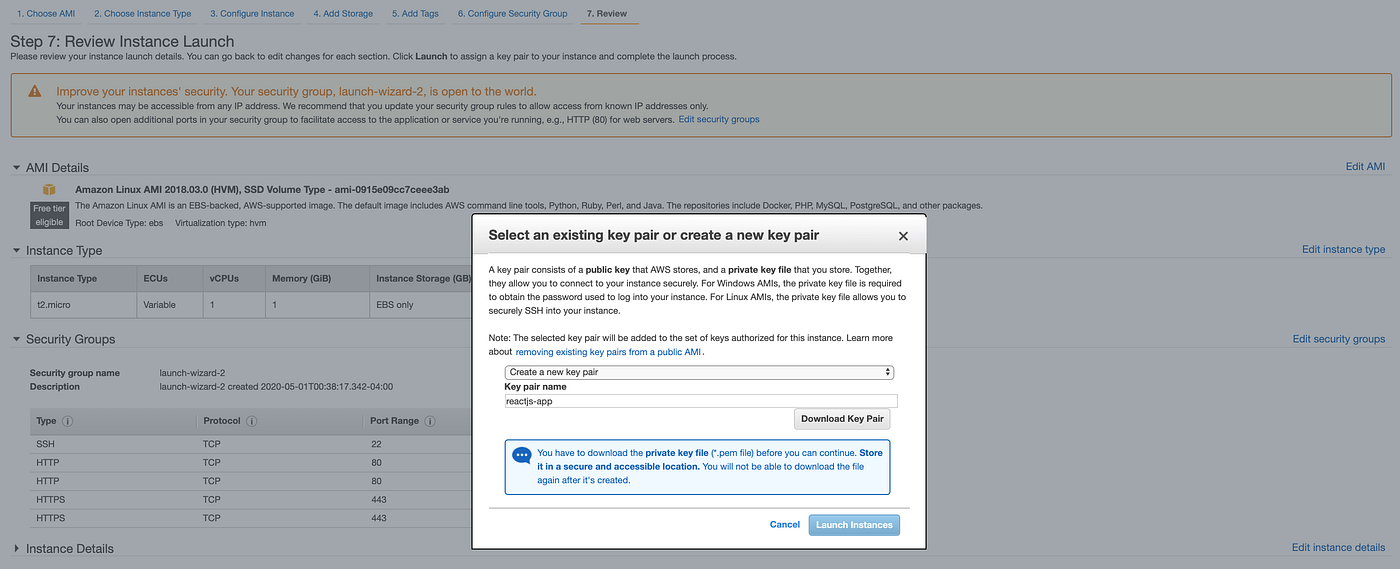
Now you will be prompted to review your instance configuration and create a key pair that allows you to connect to your EC2 instance. Use an existing key or create a new key pair, then click Download Key Pair to save the .pem key to your computer. After downloading Key Pair, select Launch Instances and wait for your instance to be launched. You can now click View Instances to return to your EC2 dashboard, where the instance will be up and running in a matter of minutes.

Here we go, you’ve now successfully launched your EC2 instance
3. Create a CodePipeline using Github, CodeBuild and CodeDeploy
AWS CodePipeline is a continuous integration and continuous delivery (CI/CD) AWS service that allows you to automate the release process for your application or service. Every time you commit a code change to your source(GitHub, AWS CodeCommit, etc), CodePipeline automatically builds, tests, and deploys your code based on the release process models you define while initializing your CodePipeline. This enables you to rapidly and reliably deliver features and updates.
In the following sections, we will go through the CI/CD pipeline stages:
Step 1: CodePipeline
Step 2: Code Source (CodeCommit or Github)
Step 3: CodeBuild and Build Specification (buildspec.yaml) File
Step 4: CodeDeploy and Application Specification (appspec.yml ) File
Step 5: Review
Step 1: CodePipeline
Let’s navigate to CodePipeline via AWS Management Console and click on Create pipeline:

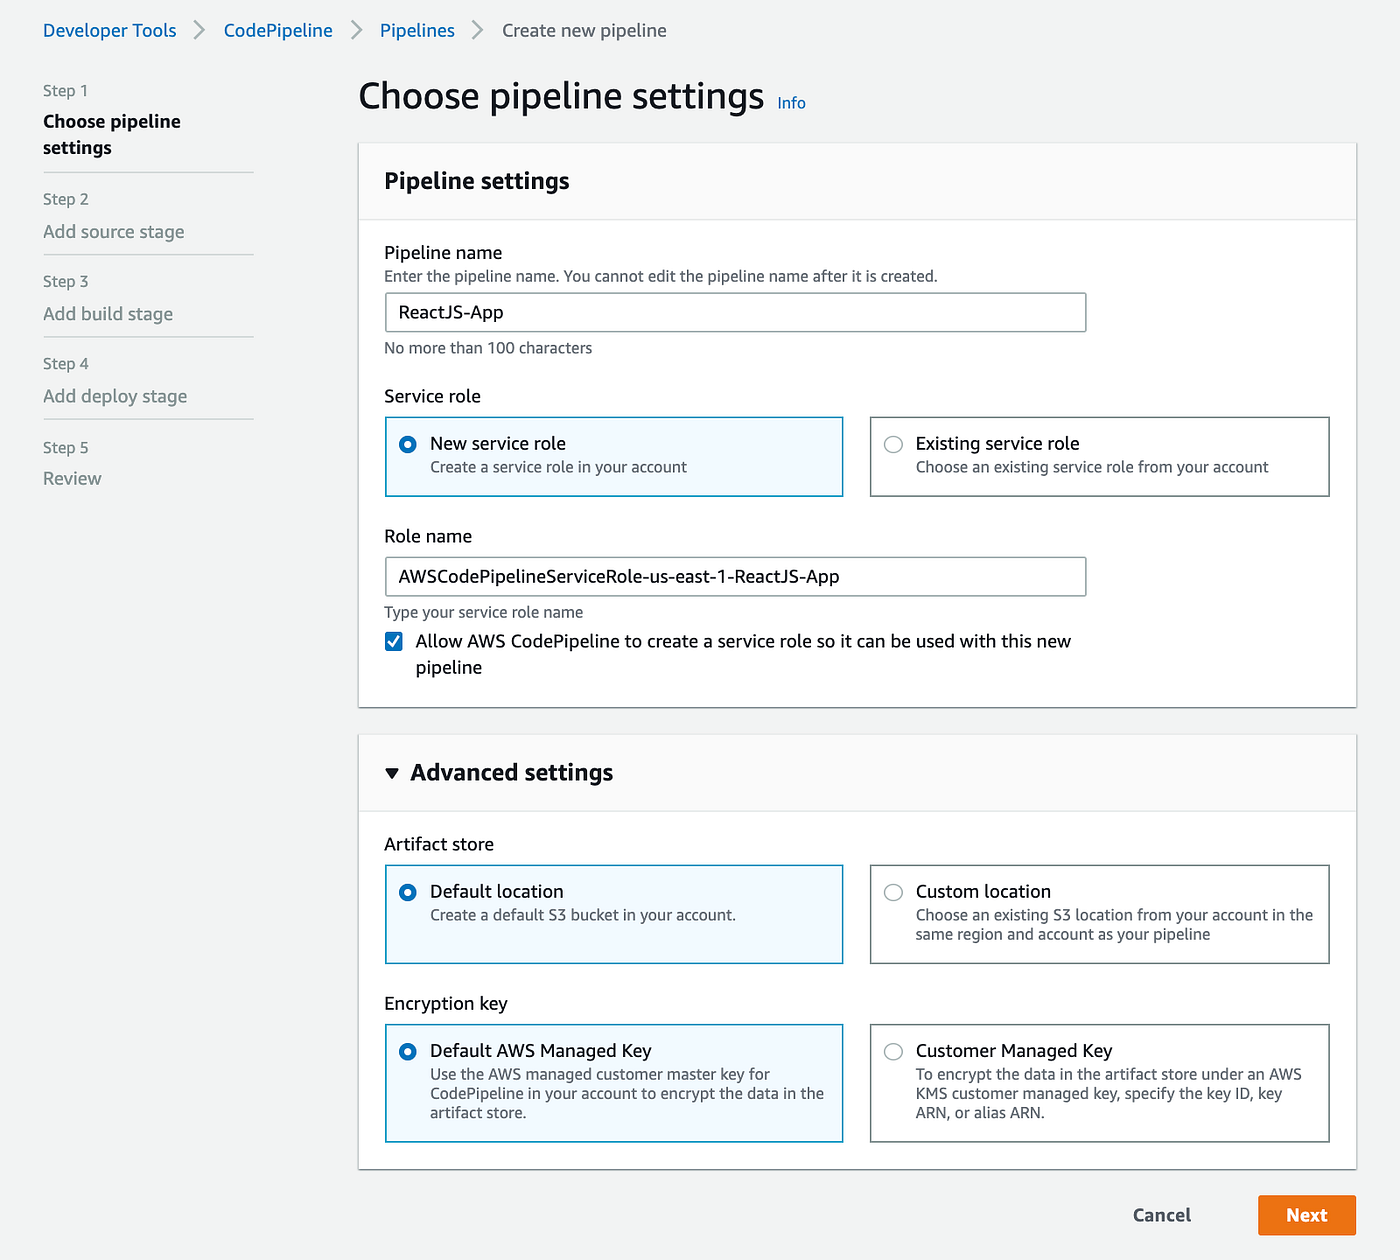
A new service role for your new pipeline will be created on this page as well. We can let AWS create a new S3 bucket to store artifacts or if you would like to store artifacts on an existing S3 bucket in the same region, you can select “Custom location” and then select your preferred S3 bucket
Step 2: Code Source (CodeCommit or Github)
As of May 2020, AWS offers five options to provide the source code for the pipeline: AWS CodeCommit, Amazon ECR, Amazon S3, Bitbucket Cloud (beta) and Github. AWS CodeCommit and GitHub are relatively similar; in this post, we will integrate AWS CodePipeline with GitHub.
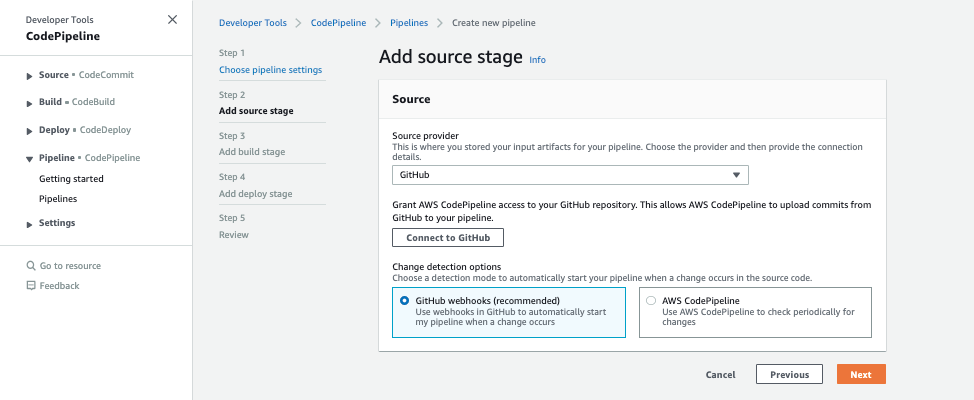
After selecting GitHub as the source provider, click on the Connect to GitHub button. You’ll then be prompted to enter your GitHub login credentials
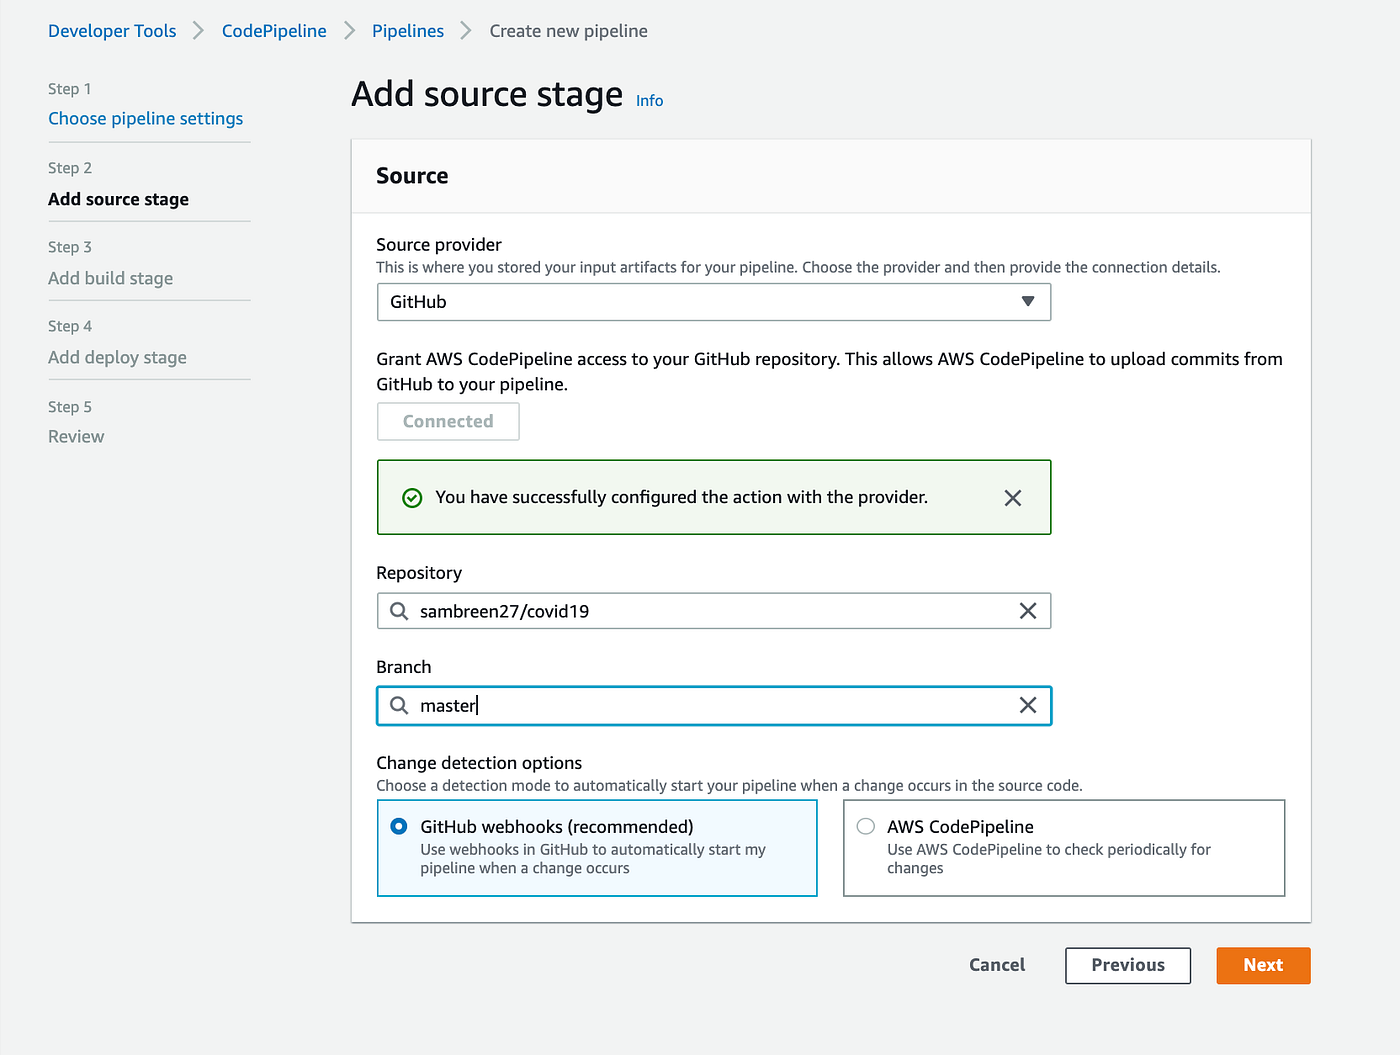
Once you grant AWS CodePipeline access to your GitHub repository, you can select a repository and branch for CodePipeline to upload commits to this repository to your pipeline
Step 3: CodeBuild and Build Specification (buildspec) File
We will now proceed to define the build provider. As of May 2020, AWS offers two options for build providers: AWS CodeBuild and Jenkins. AWS CodeBuild is a fully managed continuous integration service that compiles source code, runs tests, and produces software packages ready to deploy. Jenkins is an open-source automation tool written in Java with plugins built for continuous integration purposes. If you’re not sure which one to use, check out this article: AWS CodePipeline vs. Jenkins CI Server.
For this post, we will select AWS CodeBuild as our build provider and where we will be prompted to select a project:
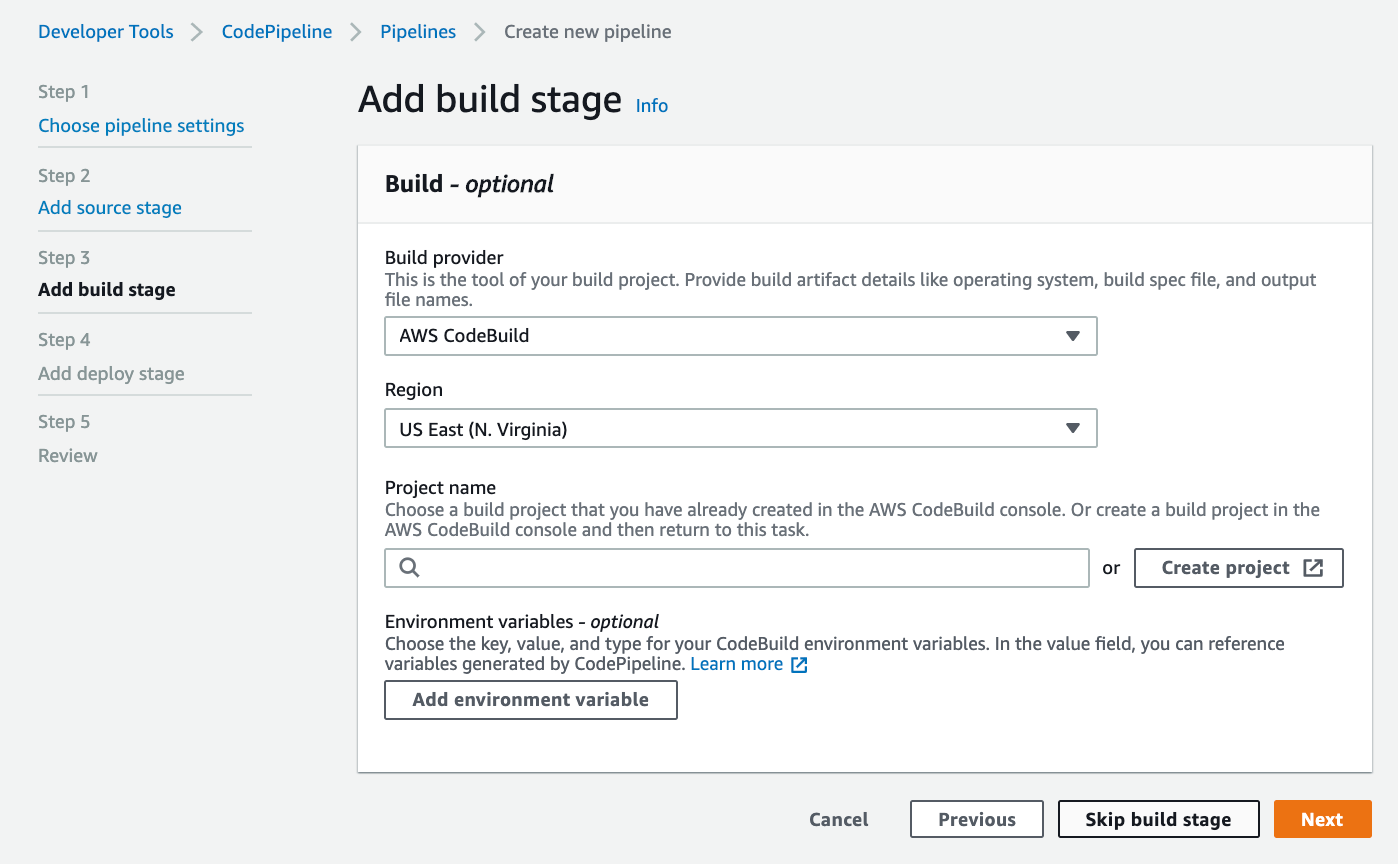
If you haven’t created a project before creating your pipeline (like me), we can create a project directly from here by clicking Create project, which will redirect us to the following page:


a CodeBuild service role will be created for AWS CodeBuild so that CodeBuild can interact with dependent AWS services on your behalf
Now, we will briefly discuss what a buildspec file is. Buildspec file is a collection of build commands and related settings, in YAML format, that CodeBuild uses to run a build. For my project, I created a buildspec.yaml file and added it in the root of my project directory:
buildspec.yaml
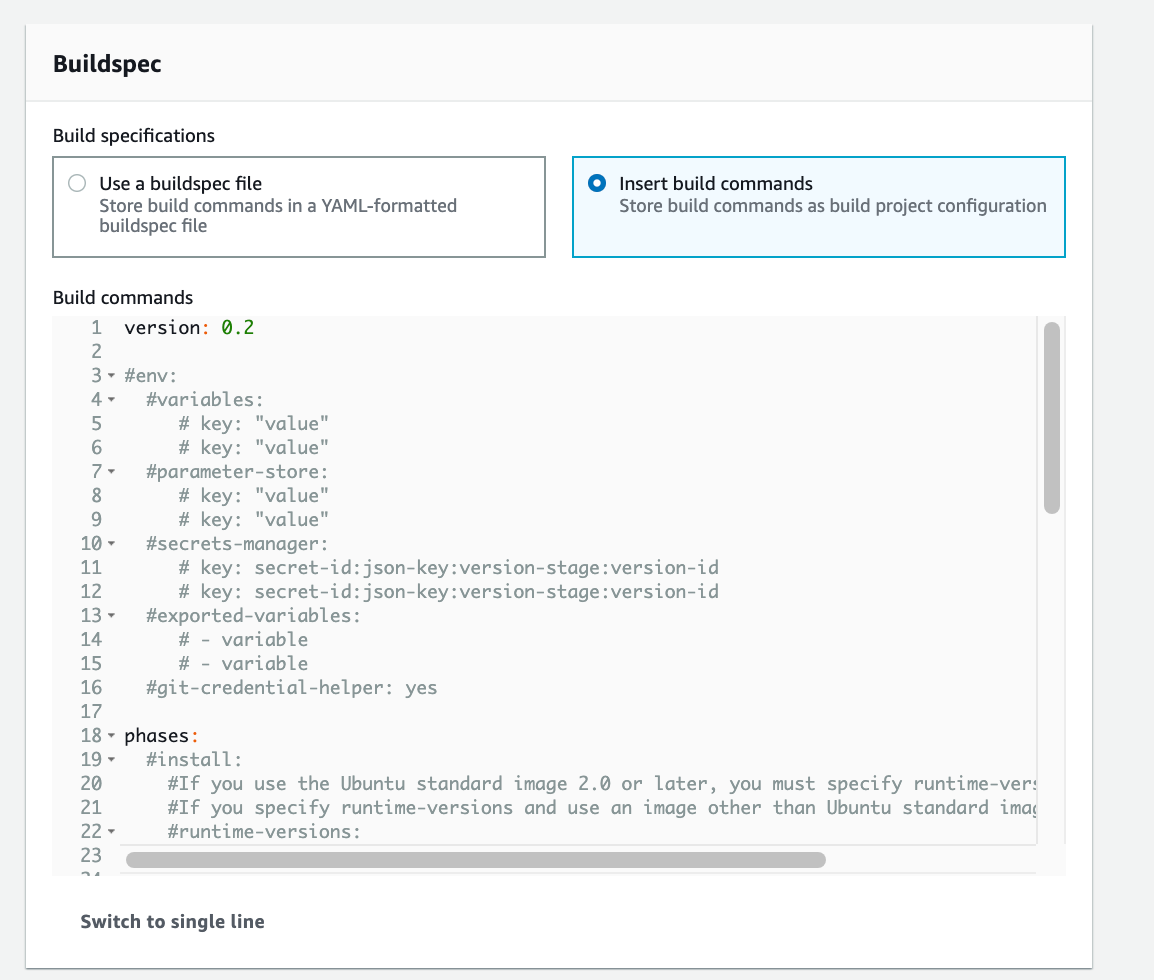
If we don’t have a buildspec file in our project directory, we can also store build commands by selecting Insert build commands and adding necessary commands. Once done, let’s click on Continue to CodePipeline
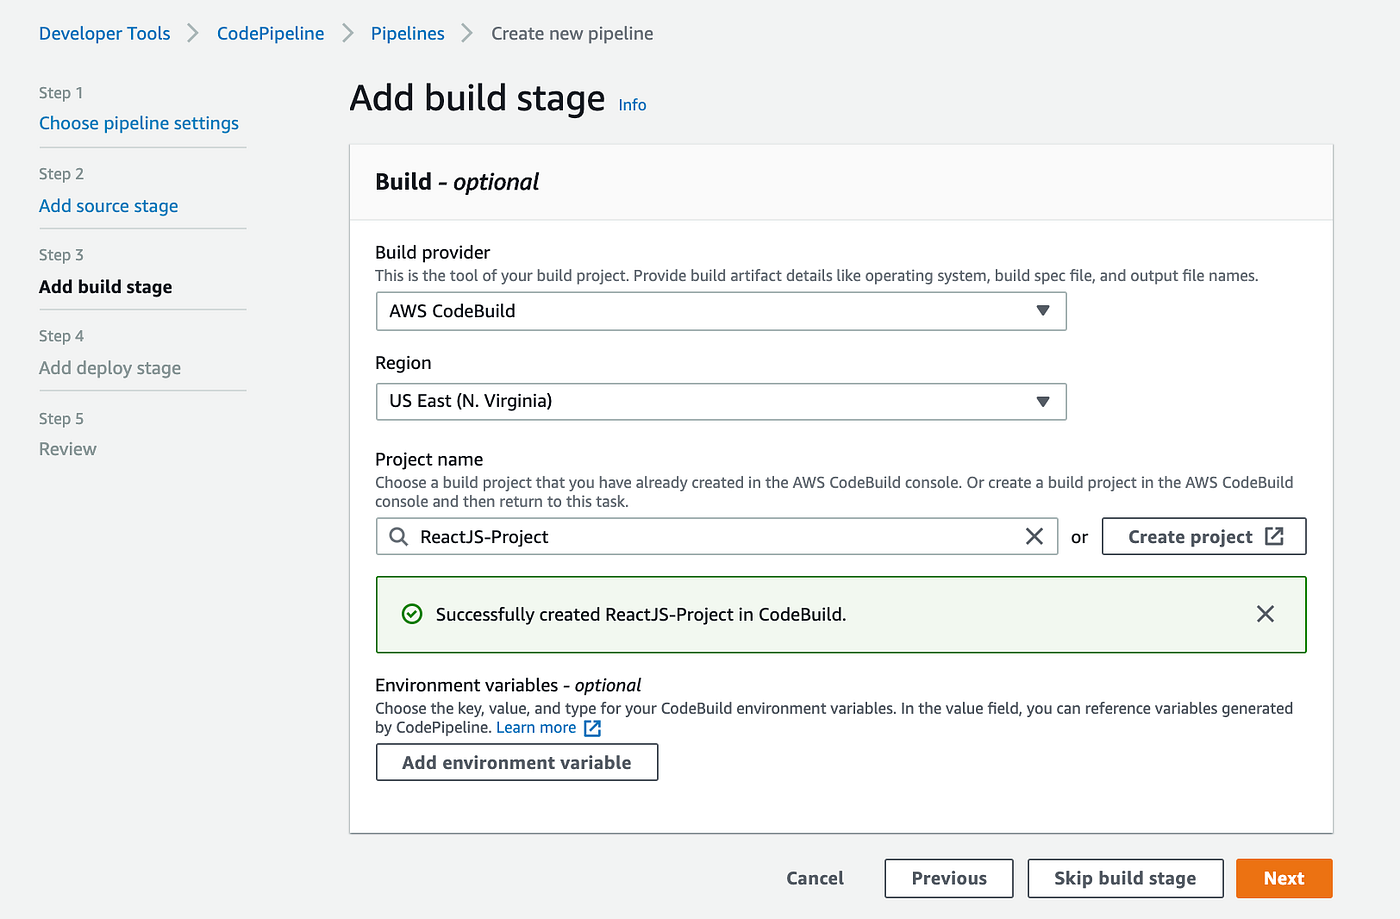
Once we have successfully created a build project, we will be redirected back to this page. Let’s now move on to Step 4: Add Deploy stage by clicking Next
Step 4: CodeDeploy and Application Specification(appspec.yml ) File
AWS CodeDeploy is a fully managed deployment service that automates software deployments to a variety of compute services such as Amazon EC2, AWS Fargate, AWS Lambda, and your on-premises servers. You can update your application with little to no downtime during the deployment process. For this post, we will use AWS CodeDeploy as our deployment provider.
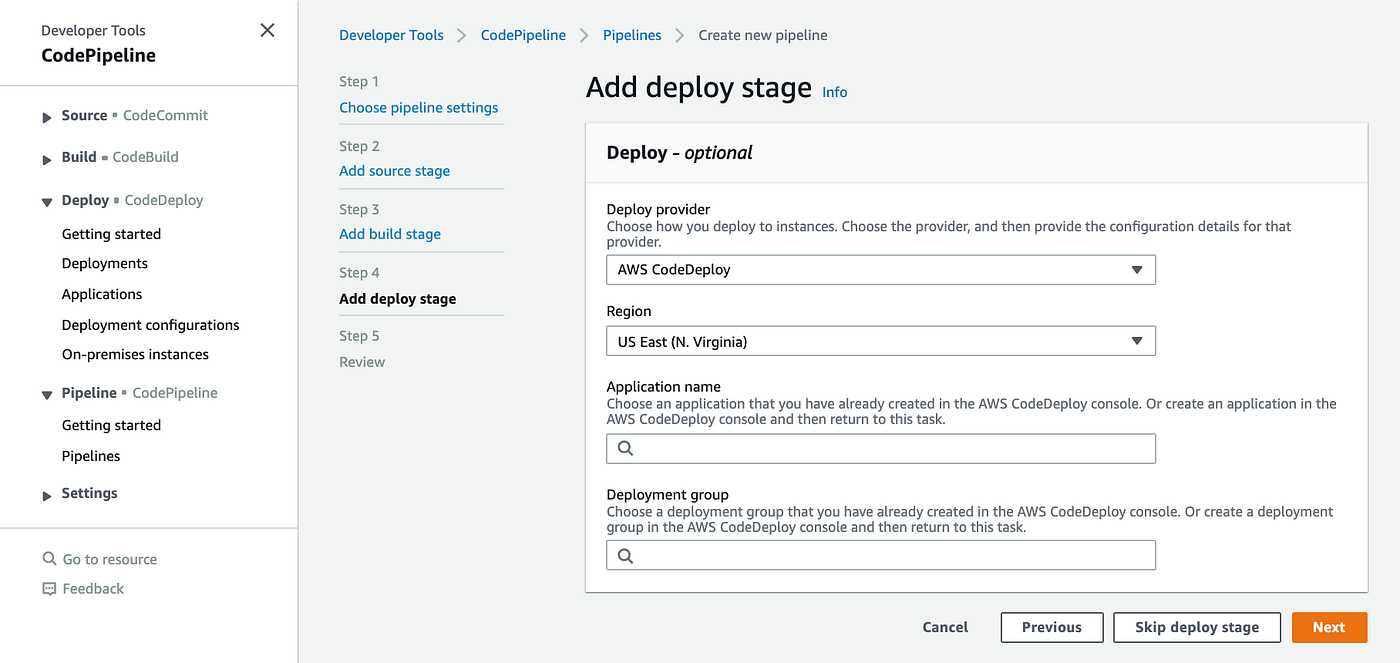
In CodeDeploy, an application is simply a name or container used by CodeDeploy to ensure that the correct revision, deployment configuration, and deployment group are referenced during a deployment. So let’s create an application! If you look at the above screenshot, on the left column, under Deploy, right-click on Applications and click Open Link in New Tab. Once you’re on the Applications page, click on Create application:
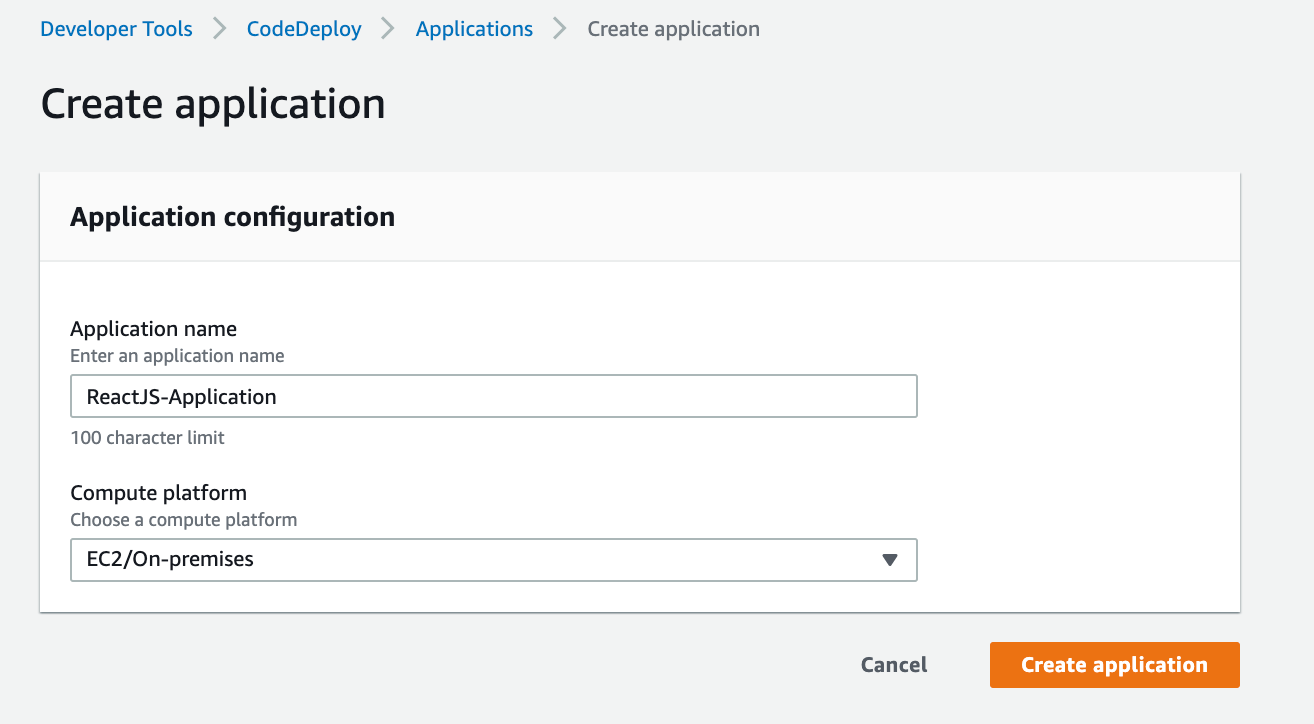
Create an application for CodeDeploy

Here we will need to create a deployment group for our application that specifies which instances your application revisions are deployed to, along with other deployment options.
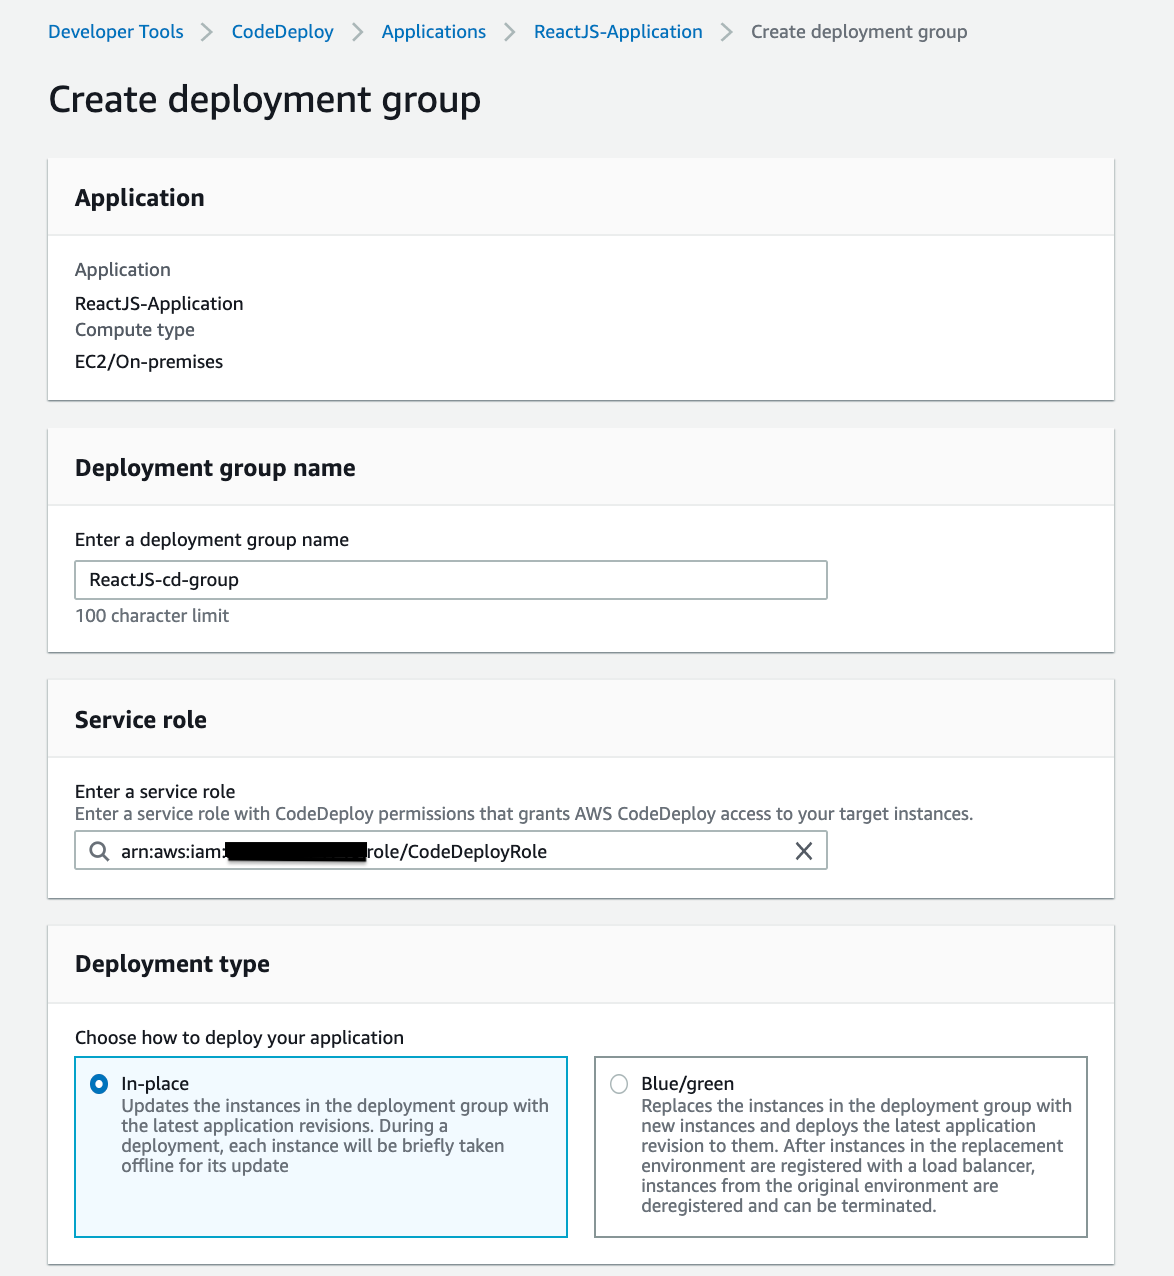
For the Service role, we will select the CodeDeployRole with AWSCodeDeployRole policy attached to it that we created earlier
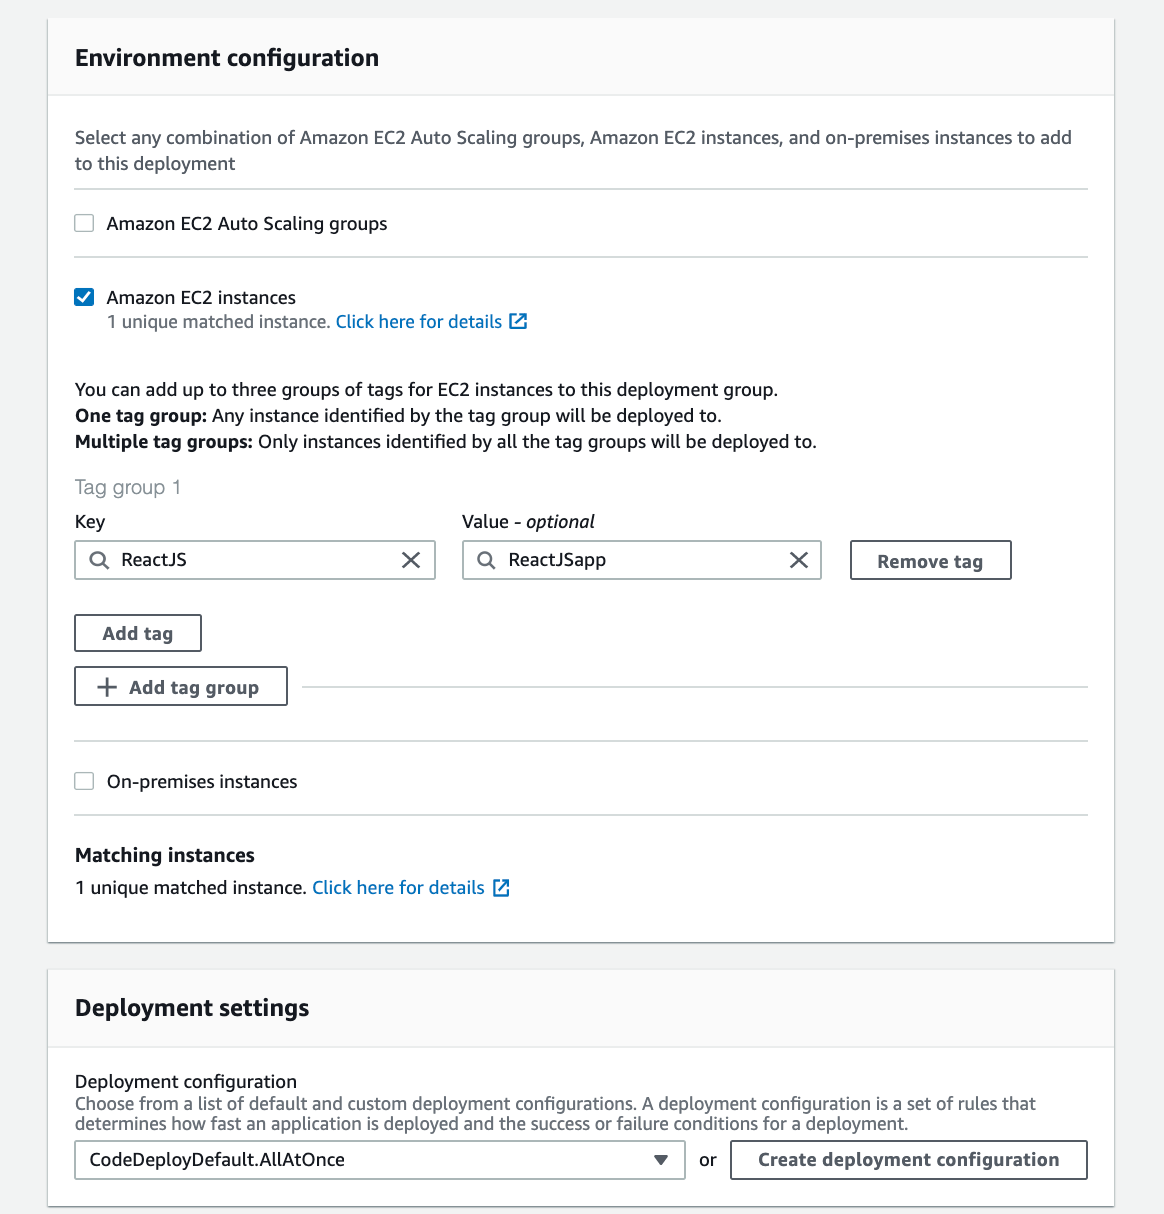
For our Environment configuration, we will only select Amazon EC2 instances. In the Key and Value fields, we will enter the values of the key-value pair we used to tag the instance earlier when we created our EC2 instance

a load balancer prevents internet traffic from being routed to instances when they are not ready or are currently being deployed to during CodeDeploy deployments. The exact role the load balancer plays, however, depends on whether it is used in a blue/green deployment or an in-place deployment. For this post, we will not configure a load balancer and will proceed to Create a deployment group
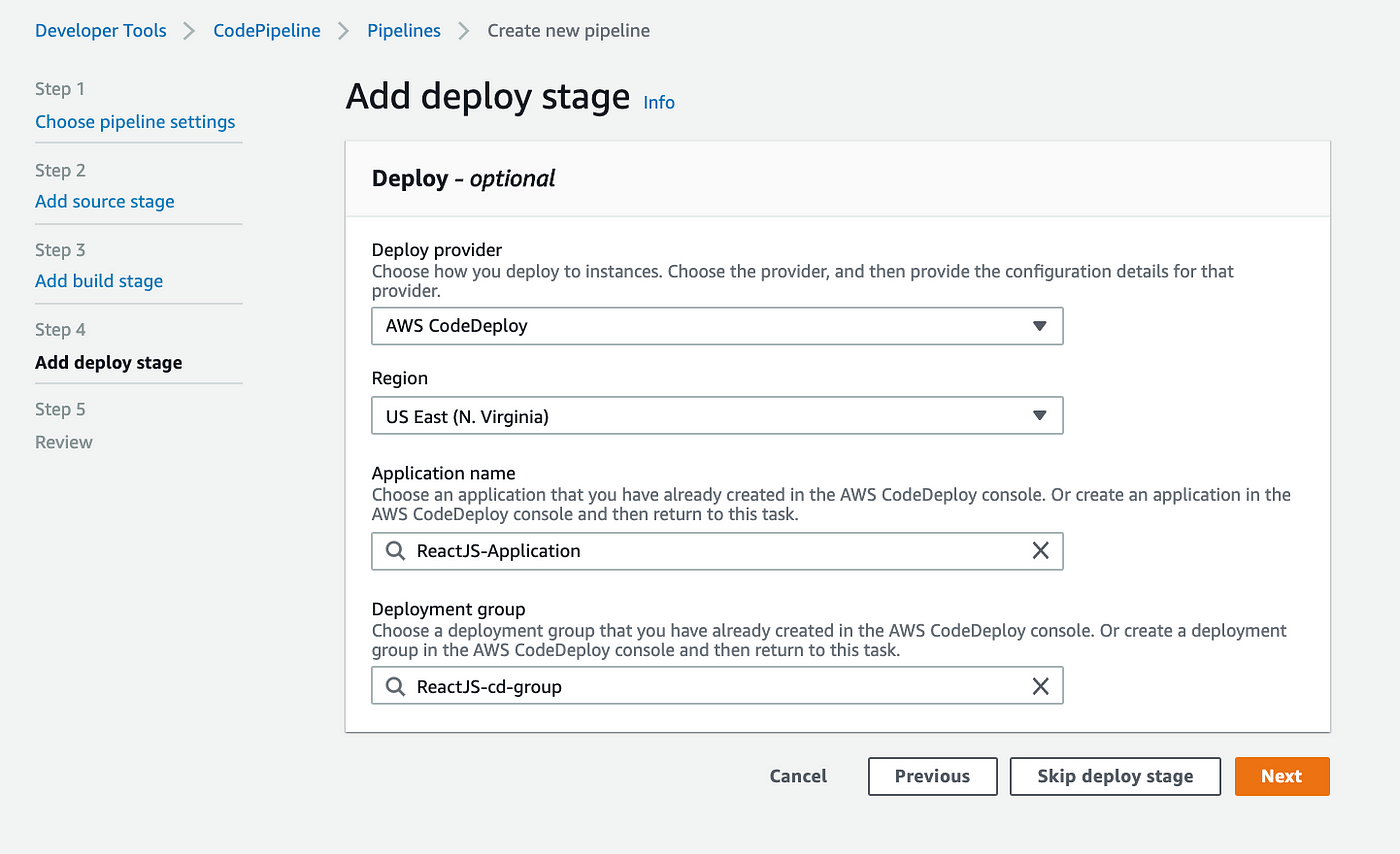
Now let’s go back to Add deploy stage browser tab and select the Application name and Deployment group that we just created and click Next to review our pipeline
DO NOT refresh your browser tab if you don’t see your application name and deployment group that you just created. If you click on the textbox for each, it will remove all the data you’ve entered so far for your pipeline. Instead, click on Previous (which will take you back to Add build stage) and then click Next and come back to Add deploy stage. You will now be able to select the Application name and Deployment group that you just created.
Here, we will briefly discuss the application specification file. AppSpec file is a YAML-formatted or JSON-formatted used by CodeDeploy to manage deployment and to determine what it should install onto your instances from your application revision in Amazon S3 or GitHub and which lifecycle event hooks to run in response to deployment lifecycle events. For more information, check out AWS CodeDeploy user guide and EC2/On-Premises deployment AppSpec example.
For my application, the appspec.yml is as follows:
appspec.yml
And the three simple bash scripts used above are as follows:
We are using a production process manager for node called PM2 to keep our app running after closing our terminal or disconnecting from remote server
Step 5: Review
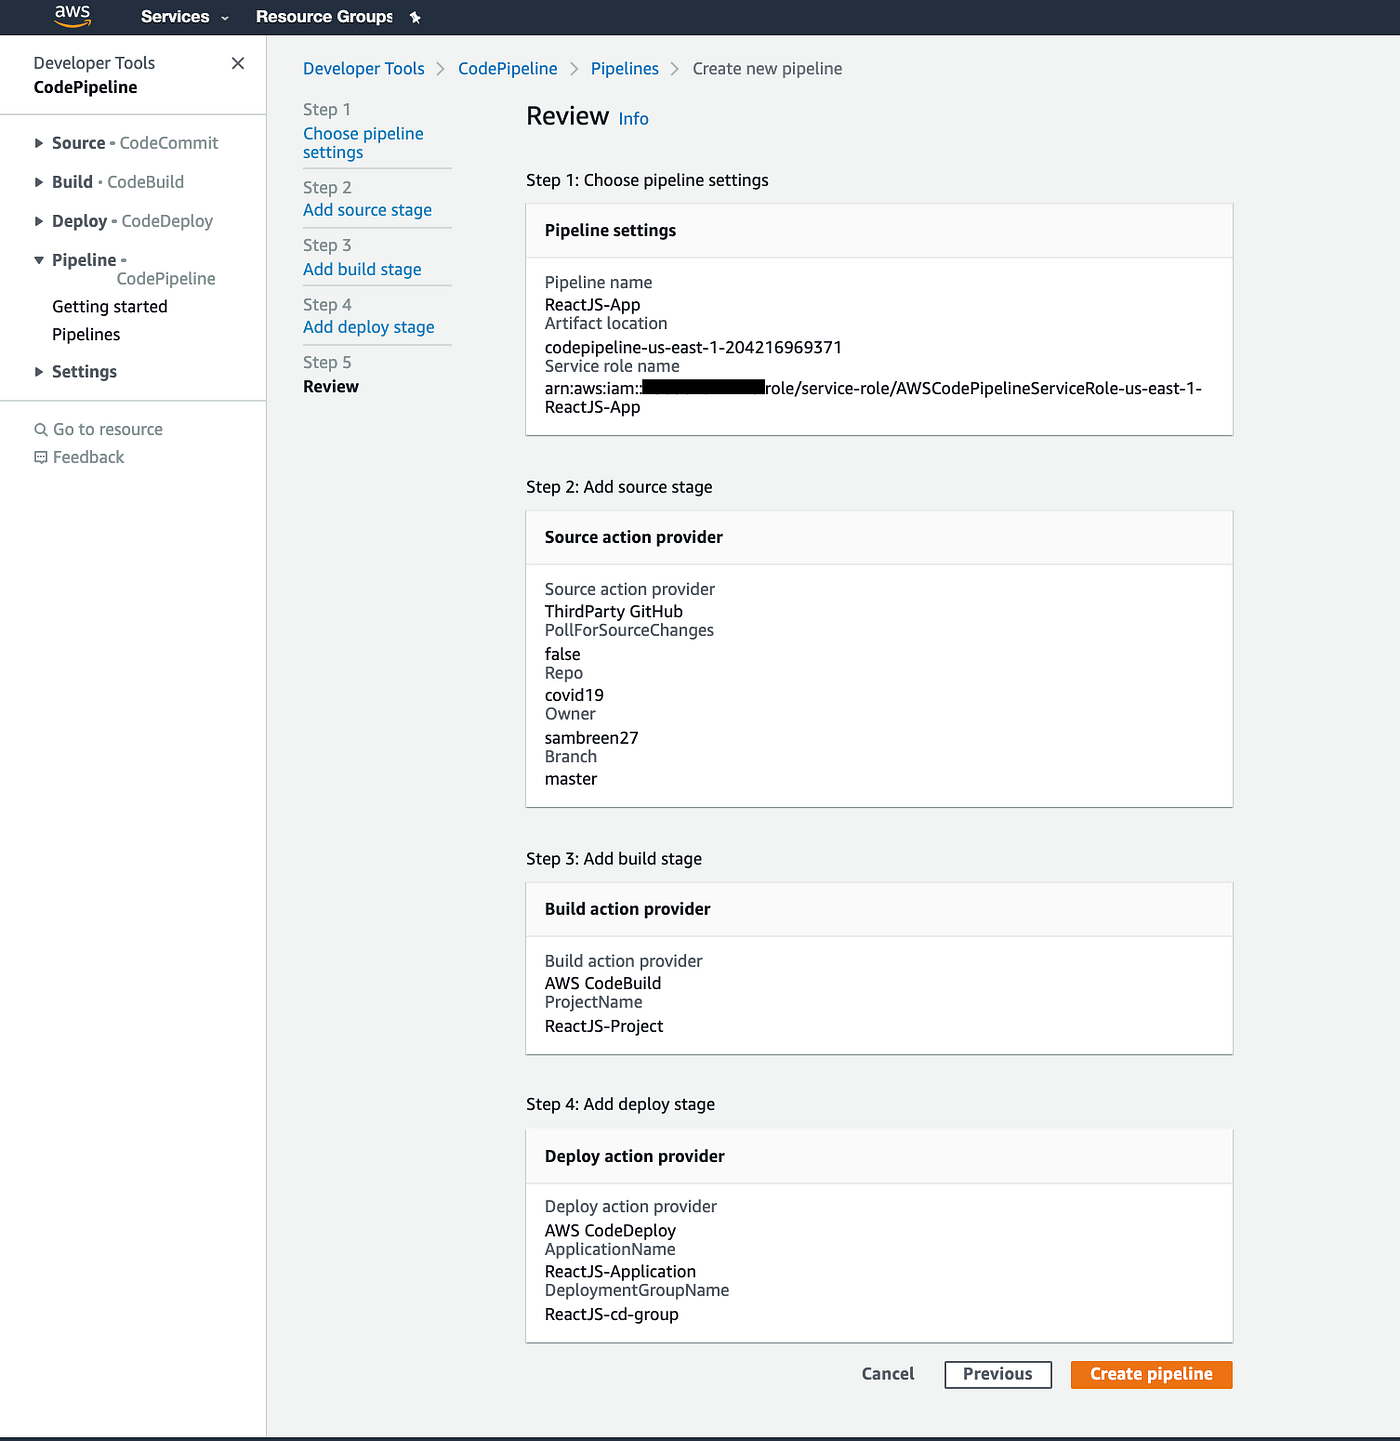
Let’s review our pipeline and click Create pipeline:

My deployment initially failed!!! ❌

There are several reasons why you would get this error. For me, my deployment failed because I hadn’t installed the CodeDeploy agent on my EC2 instance. The CodeDeploy agent is a software package that, when installed and configured on an instance, makes it possible for that instance to be used in CodeDeploy deployments. Here is a more detailed article on troubleshooting EC2/On-Premises Deployment Issues
Now connect to your EC2 instance by following the instructions in this article and install/reinstall the CodeDeploy agent on your EC2 instance:sudo yum update sudo yum install ruby sudo yum install wget wget https://aws-codedeploy-us-east-1.s3.amazonaws.com/latest/install chmod +x ./install sudo ./install auto
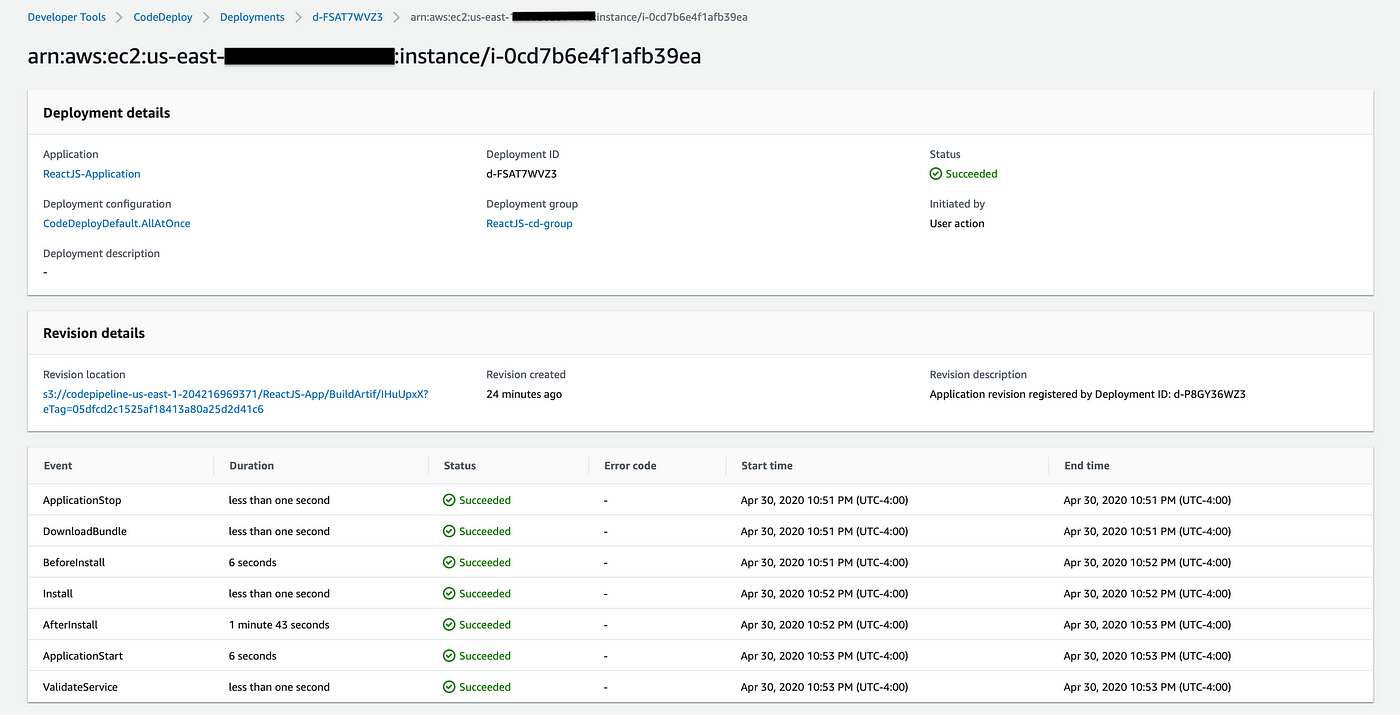
If everything goes well during your deployment stage, you will see all six events with “succeeded” status:
My deployment failed a few times, and I wasted a lot of time searching for errors and solutions on Google and reading AWS documentation. Then, here came the best part:
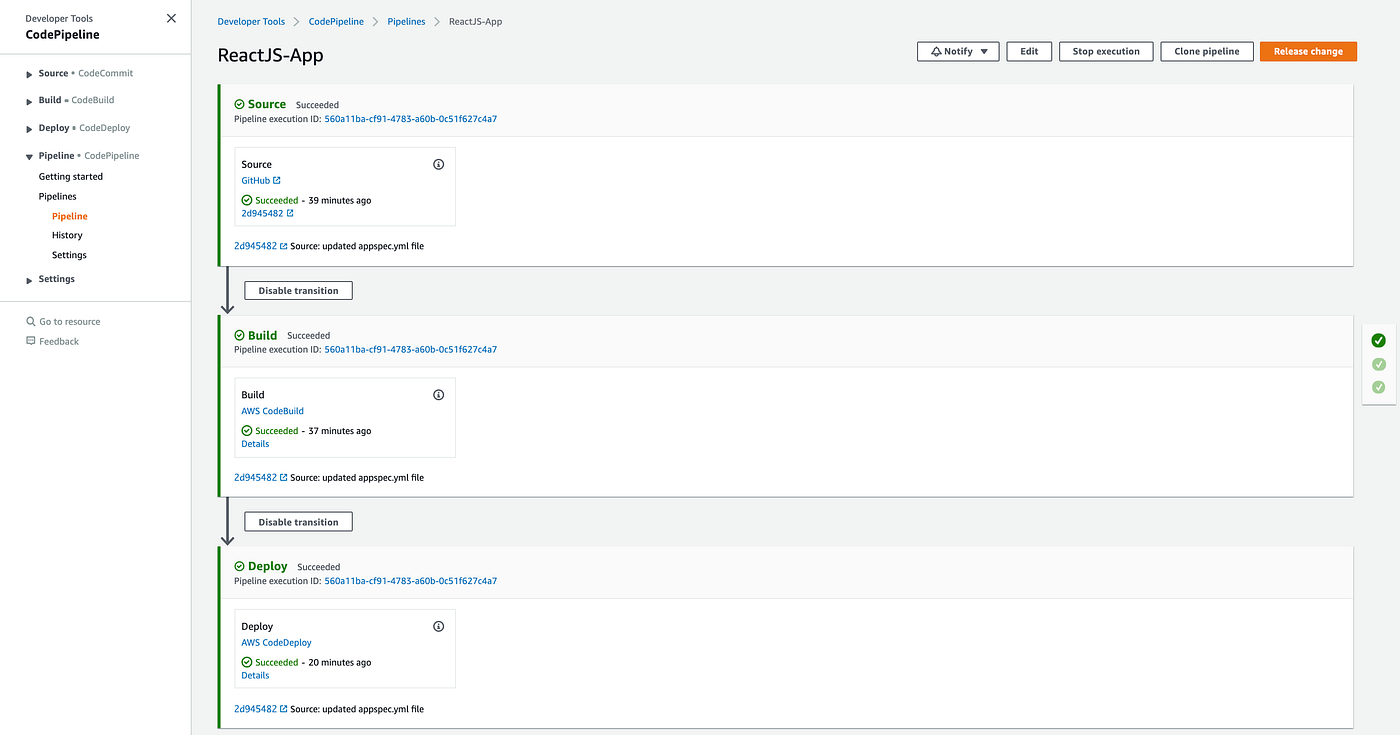
Congratulations! 🎉🎉🎉 You’ve successfully deployed your ReactJS application to EC2 via AWS CodePipeline
4. Access your ReactJS Application on EC2 Public DNS
You can access your EC2 instance on EC2 Public DNS (IPv4) located under Description in EC2 Management Console, looks something like this: ec2–3–81–44–251.compute-1.amazonaws.com. Copy/paste your public DNS (IPv4) on another tab and append port:3000 at the end of the DNS address (since our ReactJS app is using port 3000 by default). As you will see, this will not work, and there is nothing to show on the browser, and the browser connection will time out.
This is because we haven’t opened port 3000 for public access. This is where the Security Group comes in. On the EC2 Dashboard page, go to Security Groups, select your EC2 instance security group (launch-wizard-1 or launch-wizard-2 or similar) and edit the Inbound rules.

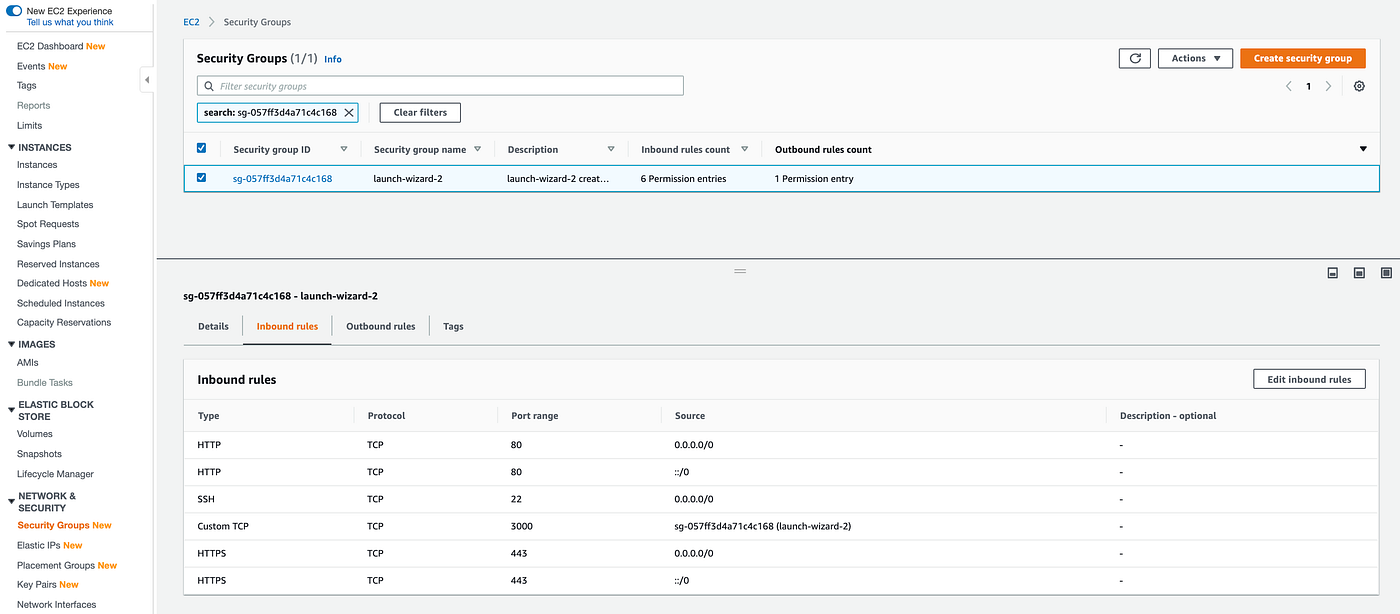
Access the EC2 Public DNS, ec2–3–81–44–251.compute-1.amazonaws.com:3000, again and you should be able to see your app content now.

5. Registering a Domain Name
You can register a domain name with Amazon Route 53 for your EC2 instance and configure the DNS. You can also acquire a free public DNS name from No IP and refer to Setting Up Dynamic DNS on Your Linux Instance for further instructions.
6. Final thoughts:
Yet again, another AWSome learning experience on AWS! There are several ways to deploy and host your web application on AWS. I chose EC2 to understand the components of its infrastructure and AWS CodePipeline to understand the continuous integration and continuous delivery(CI/CD) workflow that allows us to construct and manage the process of building, testing and deploying applications into a test/production environment using CodeBuild and CodeDeploy.
If you like this post, or you are stuck at any point in the above sections and have any questions, feel free to ask them below or message them to me on LinkedIn. I’d be more than happy to help you out.
Thank you for reading! if I have made a mistake somewhere or missed an essential point, please definitely let me know in the comments.